Time to update to El Capitan

Photo Credit: PicJumbo-Viktor Hanacek
IMG 6838While I typically wait a few months before updating to the latest major release of any OS, the time has come to start using El Capitan (OS X 10.11). The OS itself seems to have stabilized well, with the first and second major round of patching already complete an out in the wild. Additionally, there’s another pretty big reason to finally bite the bullet and upgrade:

Recently, a few apps I’d like to use have abandoned support for Yosemite (OS X 10.10), leaving users with little choice but to move to the newer version of OS X if they want to keep using the app. Since the apps in question are distributed through the Mac App Store, they simply won’t install on older versions than the developer specifies. In truth, the MAS won’t even let you purchase them on any Mac running on the earlier versions of OS X, entirely blocking you from getting the apps unless you jump into the latest OS X version.

I don’t see any major reason not to upgrade, however. The platform is getting rave reviews, and the battery life improvements will mean longer run times on my MacBook Pro. Some of the new cross-platform (OS and iOS) features are also impressive. I’ve used handoff and other tools between my Mac and mobiles since I jumped into Yosemite, and the ability to get caller ID and alerts on the Mac when I get a phone call is a nifty thing. Having the ability to send and receive both iMessage and normal SMS messages on all devices/computers is also very useful, as it means I don’t have to stop what I’m doing and grab another device just because a txt came in.

All in all, there’s no real reason not to go ahead with the upgrade, and now there are more and more reasons while taking the plunge is the best idea.

Keep your Mac from falling asleep during restore

Photo credit: https://www.flickr.com/photos/alancleaver/

Restoration from a Time Machine backup can be a lifesaver, but restoring the whole system after booting into Internet Restore can cause some serious issues – especially if that restore takes an extended amount of time.

Normally, the process would be to simply hold down CMD+OPT+R after the BOING and until the spinning globe shows up on the screen, this automatically starts Internet Recovery Mode, and allows you to connect to WiFi or a physical network jack and begin the restore process.  You select “Restore from Time Machine Backup,” select the appropriate image, and away you go.  When the process is finished, your Mac is back to the way it was before your unfortunate incident, with very few exceptions (if any).

There’s a catch though.  Jumping into Internet Recovery Mode also loads the default set of Power Management options, and restoration of a full Mac system these days might take several hours.  Those two factors add up to one massive headache.  Unless you keep the system awake by tapping a key or moving the mouse now and then, the system will go to sleep in about 10 minutes, and start shutting down spinning disks about 10 minutes later.  This means that your – presumably external – Time Machine drive will also get spun down, crashing the restore operation and forcing you to start all over again.

Obviously, it’s just not practical to sit there and keep the system awake for the 6+ hour restore you’re in for if your Time Machine is on a USB 2 disk and is over 500GB or so.  There is, however, a way to force the system to never sleep, even in Internet Recovery Mode.


First, boot into Internet Recovery Mode and wait for it to start up.  That will bring you to a screen with a window offering you the basic choices of reinstalling OS X, restoring from Time Machine, etc.  Go to the menu bar at the top of the screen, and choose Utilities, then Terminal.  This closes the first window and brings up a command-line interface (the BASH Terminal) where you can enter these three commands:


pmset -a sleep 0

pmset -a disksleep 0

pmset -a displaysleep 0


Then quit Terminal via the menu, and walk through the standard restoration operation.

Here’s what you’re doing:

pmset is a function of the underlying OS that handles setting parameters for Power Management options.  In each case you’re telling OS X to set the named Power Management option (system sleep, disk sleep, display sleep).  The “-a” tells OS X to set that option for all power profiles – while you’ll probably only use AC Power during a restore, it’s a good idea to just tell the Mac to use it for all of them.  “0” sets the time-out to zero, in other words never sleep.

The result is that the Mac will never dim the display, got to sleep, or stop the spinning disks until you a) re-set those options or b) boot into another OS instance. Since you’re going to boot into a new instance when the restore is done, you don’t have to worry about changing them back later.

Simple as that!  Open Terminal, type those three commands, and then quit Terminal and walk through the restore process from your Time Machine backup with no interruptions.

Critical Mac Security Update

For those of you who keep an eye out for weird pop-ups and messages, you most likely noticed a Notification or Growl message that “A critical security updated has been applied.”

When I saw that, I had a moment of panic, as I had – up until now – told OS X that I wanted to manually install patches, updates, and fixes. So this message out of the blue was a bit of a shock. After some online research (and with help from some great Twitter friends like @UberBrady ) I was able to get to the bottom of it.

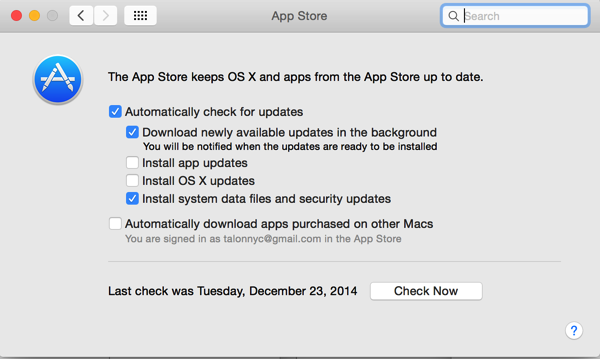
First things first, if you upgraded to Yosemite from earlier versions of OS X, most of your preferences came over – but one very important one was added and is turned on by default. OS X starting in Yosemite includes an “emergency update system” that automatically downloads and applies any patches that Apple believes to be extremely critical security fixes. They have, to date, only classified one such patch in that category, and this was it. This critical update system is ENABLED by default, and frankly you should leave it enabled. But if – for some reason – you need to turn it off, jump over to Apple Menu| System Preferences| App Store and you’ll see the settings for auto-updates, including the relatively new one for emergency patches labeled “Install system data files and security updates”:

Screenshot of the App Store preferences

Even though this would appear to be for a lot of patches, note that you’ll still have to download and install “optional,” “Important,” and other patches manually if you do not check the other two boxes.

Now, onto the particulars of the update:

Apple recently announced a fix for a Network Time Protocol (NTP) system in OS X. The bug could allow an attacker to take control of system resources (which is a bad thing) with relatively little effort (which is a HORRIBLE thing). This means un-patched systems are vulnerable to attack and need to be patched immediately. Luckily, if you haven’t changed the defaults, Yosemite will patch it automatically as described above.

A more detailed explanation of what the vulnerability is can be found on Apple’s Site.

So, have no fear, the unexpected Notification is not, itself, and attack. Rather, it’s a new feature in OS X designed to help protect against attackers, and was just rather well hidden – and never before used – up to this point.

Stay Safe!